
Make your very own Family Face Pattern

The Marshmallow Railroad Construction Challenge
June 9, 2017Learn Math with your Family Face Pattern
This activity mixes drawing and art with mathematics. Make a portrait of everyone in the family, and then lay them out together, mathematically, to create an infinite pattern -- to use on clothes, paper, screens, and beyond!
How long?
half-day
What's the Learning Outcome?
Geometry
Visualization
What age is it for?
5 & up (littler ones can help with drawing!) -- and adults are needed to help with the software. You can possibly have 10 and up do many parts of this, but it really needs an adult along for the ride.
What You'll Need
- Pen, paper, and other colors
- Or, a digital drawing tool -- iPad, drawing tablet, etc.
- Vector Image-editing software like Sketch, Adobe Illustrator, or Inkscape
How to Create your Own Family Pattern
Take some quick and funny drawings of your family members -- no matter how silly or sketchy -- and make it into wearable art.
We will help you go from an art project to your own custom patterned clothes and other fabric gifts.
Step 1
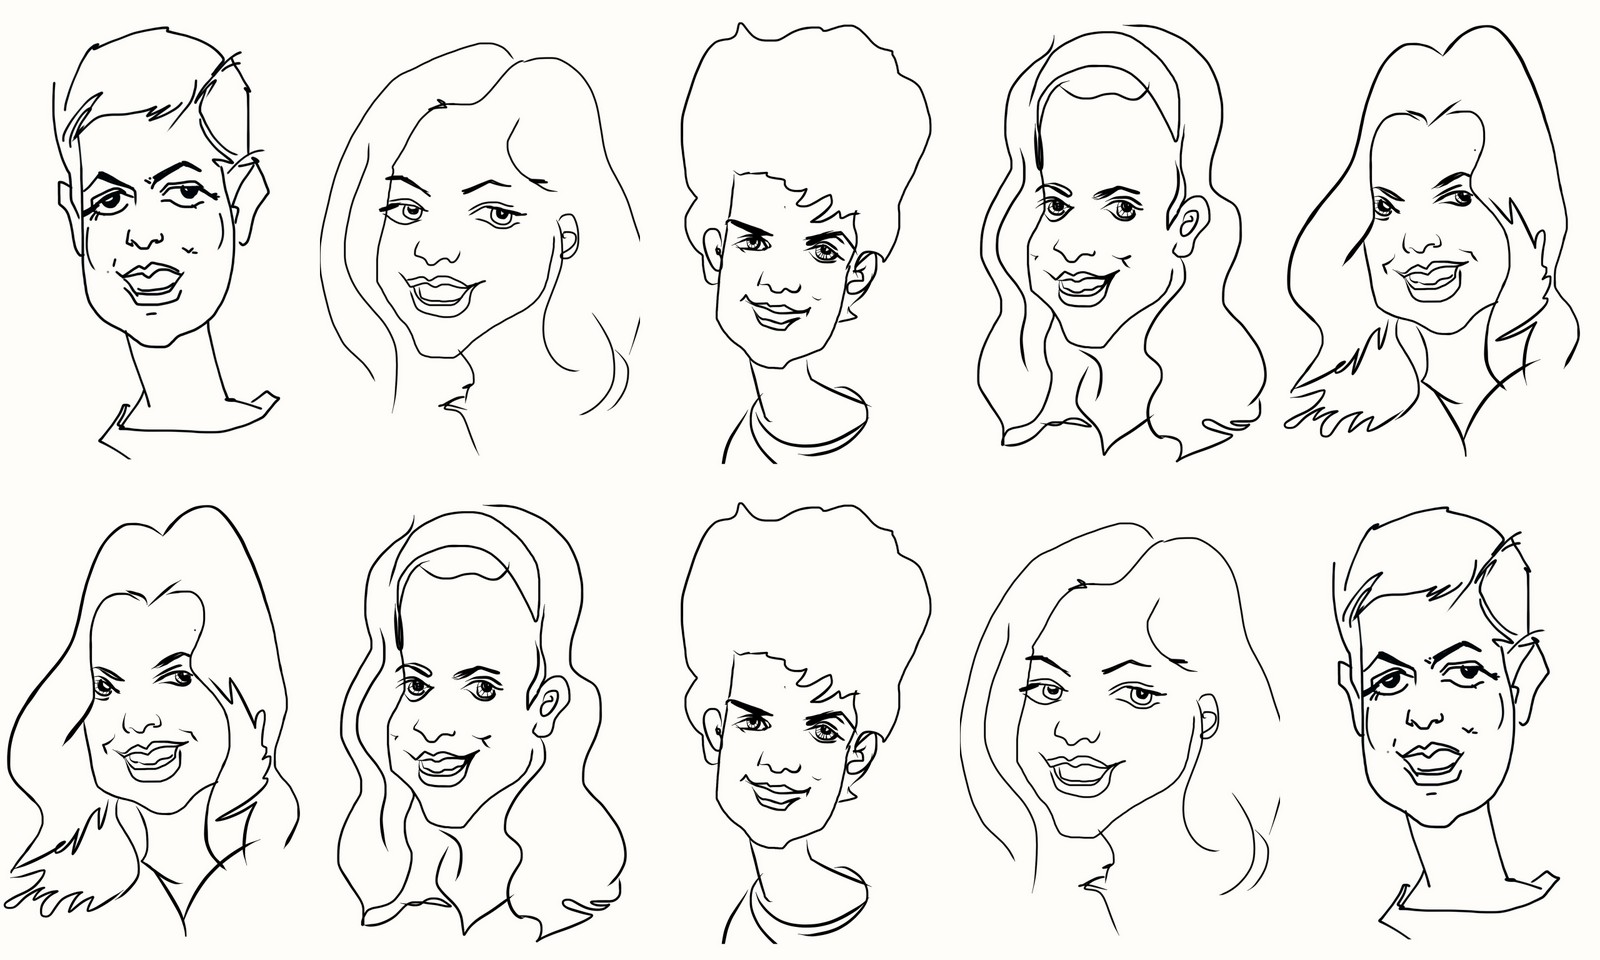
Sketch or photograph all the family's faces. They can be silly, messy, or precise. You should get them to be the same height as each other. Crop out backgrounds -- get each face down to the same face shape, without extra details.
The ideal is to do it digitally -- on your phone, on your tablet, or on your computer. But you can also do it on paper and then take sharp images of the faces with a digital camera phone.

For this activity, I'm doing the starting lineup of the 2016-17 Pittsburgh Penguins. They are not my family, but hopefully a good example for you to watch in action! I sketched them out using their Google Image headshots as a basis.
Step 2

Software, go! We're not going to get into all the details of how to use a vector-image editing software -- ideally you have someone you can borrow who knows how to operate Concepts, Illustrator, or Sketch.
There is a detailed software step-by-step for creating patterns here, over at 99 Designs -- where they go through all the precise software steps.
Okay, are you good to go? Software up and running?
Create a new file, and get the images of the faces onto the canvas.
You'll be creating artboards, shapes, and playing with copy/paste, resizing. Make sure you are ready to go!
Step 3

Get the faces cleaned up and sized the same. You want each face to be the same dimensions, pixel-wise. The faces should each be the same height and width. Use your image editor on your device to get to all face images the same size.
Step 4

Time for some geometry! We are going to make tessellations. And we need a vector-image design software -- preferably Sketch or InDesign. You are going to make the base of your pattern as a tile -- all of the face images laid out on this single tile. Then we will replicate this tile in tessellations to create the full fabric pattern.
On your software, make a square shape. The color is irrelevant, it will just be for our guide. We can recolor it later, or make it transparent.
Lay out your family faces on the square -- stagger them around, play with their layout, but get them on the square.
Step 5

Time to make the tessellation square. We want to have the faces overlapping on the top and the right. We will replicate this tile in tessellations to create the full fabric pattern.
You want to have some space on the square at the bottom and the left, with no faces there. This is where overlapping is going to happen, with neighboring tessellations.
Make your best guess at the way to pattern your faces on the tile -- and then make a duplicate of everything (the square and the faces). Make this duplicate on a separate layer, with this layer beneath the first layer. Move the duplicate immediately to the right of the first tile, and line the squares up to exact alignment.
If the faces don't line up well, or they touch each other, it's time to start again. Delete the duplicate, and go back to the original tile. Rearrange the faces another time, with a better guess of how to lay them out so they will tessellate right.
Step 6

Did you get the tessellation tile ready to go? Keep experimenting, with face layouts on the square, duplicating it, lining it up, and seeing if the two-tile tessellation looks good.
Once you get that 2-tile tessellation to your satisfaction, add a third one in!
Again, duplicate the entire square and faces group. Put it on a 3rd layer. That 3rd layer should be beneath Layer 2.
Does the 3-tile Tessellation Pattern look good? Yes? On to the next and final big design step.
Step 7

Time to get vertical!
Now that we have horizontal tiles down, now it's time to add the tile on top of your existing tiles.
Play around, get it right, until the tessellations line up well into the pattern you want.
Once you have it, add in more tiles in this second row.
Step 8

The world is yours -- you have your tessellation tile ready to endlessly repeat!
Keep adding in tiles using the same protocol you've been using, copy, paste, add new layer, move that layer underneath, and move the tile to the right alignment.
Add, move, repeat, as much as you like (or as much as your software/computer processor can handle without slowing you down.

Margaret H.
Designer and Mom
In California, but perpetually a Pittsburgher
I love to draw, do crafts and creations, and have been teaching myself how to code apps. I have two little boys, whom I love to play art and educational games with.
Learning Outcome
This project will stretch your visual thinking and experimentation skills. Creating effective patterns will require playing around to predict the effect that laying out faces in a tile will have when you duplicate this tile and make it into a pattern. You will almost never get the right layout on the first go -- you will have practice, predict, and learn from your mistakes.
Want to learn more about designing patterns?
We love this book, Designing Patterns, by Lotta Kuhlhorn about how she designs patterns for fabric and beyond.
If you are interested in the book, it's here at Amazon.
(We get an affiliate referral fee, if you click on this link and buy the book -- full disclosure!) We only recommend books that we actually love and use -- including this one by Lotta. It is incredible, colorful, and inspiring in its mix of math and art.